Send Uploaded Files Through Ajax to Partial
Introduction
Nosotros volition create an instance here and we volition show you how to upload single file or multiple files using AJAX and jQuery along with Python Flask technologies. Y'all tin can either upload single file using browse button or multiple files using browse button by holding CTRL key(in Windows OS) from keyboard while selecting multiple files.
The file or files is/are uploaded into a folder called uploads. Make certain this uploads folder exists in the system.
We volition as well show success or error messages appropriately.
The do good of using AJAX technique is your unabridged folio will not become refreshed on success or mistake and instead you will meet a particular area on the page gets updated.
Related Posts:
- Single File Upload using Python Flask
- Python Flask REST API File Upload Case
- Python Flask Multiple Files Upload Instance
- Python Flask REST API Multiple Files Upload
Prerequisites
Python iii.seven.4, Flask ane.1.1
Creating Project Directory
Create a project root directory calledpython-flask-ajax-files-upload every bit per your chosen location.
We may not mention the project's root directory name in the subsequent sections only we will assume that we are creating files with respect to the project's root directory.
Configuring Awarding
We will configure application through flask framework. Nosotros will also define our file upload location and maximum size of all files a user tin upload.
Nosotros should not allow user to upload unlimited size of file due to security reasons or to avert exhausting server space.
Create a file calledapp.py with the below code.
from flask import Flask UPLOAD_FOLDER = 'C:/uploads' app = Flask(__name__) app.secret_key = "underground cardinal" app.config['UPLOAD_FOLDER'] = UPLOAD_FOLDER app.config['MAX_CONTENT_LENGTH'] = 16 * 1024 * 1024 Creating Template View File
We are using template file file-upload.html under templates directory to render the file upload folio.
We include jQuery library into<head/> section of the HTML folio. As the example AJAX multiple files upload using Python Flask jQuery suggests and without jQuery or JavaScript engineering AJAX technique will not work, jQuery library is required.
Y'all may also apply evidently JavaScript to employ AJAX technique but jQuery provides many built-in functionalities advert easy to use.
We have put the upload field inside<torso/> tag in HTML page.
Find here how thename attribute is used.
We have likewise usedmultiple attribute to signal that we volition upload multiple files by holding CTRL key (in Windows Bone) while selecting files.
We take added beneath jQuery, AJAX code immediate after the jQuery library inside<head/> section of the HTML page.
WhenUpload push button is clicked and so we first create a newFormData object to store the file information.
Nosotros first think the file counts and store each file intoFormData object.
We then finally transport the file data usingpython-flask-files-upload REST endpoint where server side code is written for uploading to the destination directory.
<!doctype html> <html> <head> <championship>Python Flask File(s) Upload Example</championship> <script type="text/javascript" src="https://code.jquery.com/jquery-3.iv.1.min.js"></script> <script type="text/javascript"> $(certificate).ready(office (e) { $('#upload').on('click', role () { var form_data = new FormData(); var ins = certificate.getElementById('multiFiles').files.length; if(ins == 0) { $('#msg').html('<span style="color:red">Select at least one file</span>'); render; } for (var x = 0; x < ins; 10++) { form_data.append("files[]", certificate.getElementById('multiFiles').files[x]); } $.ajax({ url: 'python-flask-files-upload', // signal to server-side URL dataType: 'json', // what to expect back from server cache: imitation, contentType: false, processData: false, data: form_data, type: 'post', success: function (response) { // display success response $('#msg').html(''); $.each(response, function (fundamental, information) { if(cardinal !== 'bulletin') { $('#msg').append(central + ' -> ' + information + '<br/>'); } else { $('#msg').append(data + '<br/>'); } }) }, error: office (response) { $('#msg').html(response.message); // display error response } }); }); }); </script> </head> <body> <h2>Python Flask File(s) Upload - Select file(s) to upload</h2> <dl> <p> <p id="msg"></p> <input type="file" id="multiFiles" name="files[]" multiple="multiple"/> <button id="upload">Upload</button> </p> </dl> </trunk> Configuring View and Remainder Endpoint
Nosotros take divers root (/) endpoint that will merely render the template view file with file upload selection on the page.
Nosotros will create REST endpoint that volition be used to upload single or multiple files into the server at a destination folder uploads.
Nosotros evidence a successful message once file or files uploaded successfully or mistake letters depending on the server or client mistake.
If fractional file(s) are uploaded and then nosotros will see both success and error messages.
For success bulletinmessage is the key in the JSON response.
For mistake messages file name is the key in the JSON response.
We define a methodallowed_file(filename) to allow user merely upload allowed file types.
Simply with successful operation we send response status 201 otherwise we send 400 bad asking with error message.
Create a filemain.py with the below source code.
import bone #import magic import urllib.request from app import app from flask import Flask, flash, request, redirect, render_template, jsonify from werkzeug.utils import secure_filename ALLOWED_EXTENSIONS = set(['txt', 'pdf', 'png', 'jpg', 'jpeg', 'gif']) def allowed_file(filename): return '.' in filename and filename.rsplit('.', ane)[i].lower() in ALLOWED_EXTENSIONS @app.road('/') def upload_form(): return render_template('file-upload.html') @app.route('/python-flask-files-upload', methods=['Postal service']) def upload_file(): # check if the postal service request has the file part if 'files[]' not in request.files: resp = jsonify({'bulletin' : 'No file office in the request'}) resp.status_code = 400 render resp files = asking.files.getlist('files[]') errors = {} success = Fake for file in files: if file and allowed_file(file.filename): filename = secure_filename(file.filename) file.salvage(os.path.join(app.config['UPLOAD_FOLDER'], filename)) success = True else: errors[file.filename] = 'File blazon is non allowed' if success and errors: errors['bulletin'] = 'File(southward) successfully uploaded' resp = jsonify(errors) resp.status_code = 206 return resp if success: resp = jsonify({'message' : 'Files successfully uploaded'}) resp.status_code = 201 return resp else: resp = jsonify(errors) resp.status_code = 400 render resp if __name__ == "__main__": app.run() Deploying the Awarding
Now navigate to the project's root directory using command line tool and execute the commandpython main.py, your server will be started on default port5000.
If you want to change the port then you can change the lineapp.run() toapp.run(port=5001), where5001 is the new port.
Testing the Application
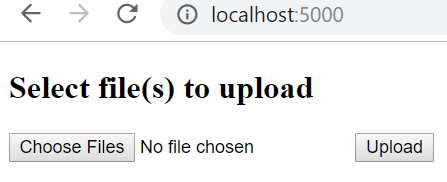
Home Page
Hit the URL http://localhost:5000/ in the browser and y'all volition see output as shown beneath in the paradigm:
Validation Error – No File Selected
When you select no file and try to upload by clicking on the Upload button.

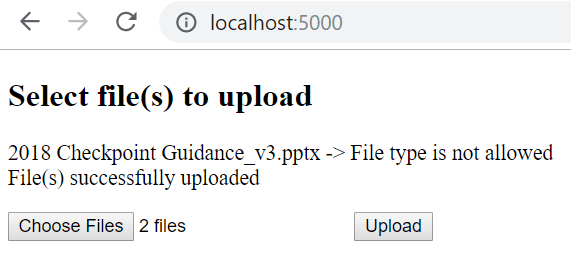
Partial Success – Allowed and non-allowed Files
Endeavour to select multiple files (usingCtrl cardinal) and click onUpload button.
So here ppt file is not immune but pdf file is allowed to be uploaded into the server.
Therefore allowed file types are uploaded and non-allowed file types are not uploaded and displayed with error message including file name so you can be sure which file(s) were not allowed to upload.
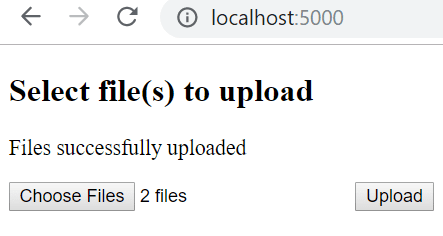
Success – Allowed Type Files Only
Effort to select multiple files (usingCtrl key) and click onUpload button.
In this example you will become merely success message because all files are allowed in allowed types.
That'southward all.
Source Code
download source code
Thanks for reading.
Source: https://roytuts.com/ajax-files-upload-using-python-flask-jquery/
0 Response to "Send Uploaded Files Through Ajax to Partial"
Post a Comment